Introduction
A common module editing task is bulk renaming or deletion of images. To that end, editors frequently unpack modules to access their contents, make modifications, and then re-pack the files back into a Vassal module.
Hierarchy of a module
It’s important to understand the organization of files inside a module in order to re-pack it correctly and avoid the error message that Vassal cannot open your module because it is not a recognized file.
In general, the structure of a module is
module.vmod -+- buildFile.xml
             +- moduledata
             +- images
             +- sounds             # Optional
             +- .vlog files        # Optional
             +- .vsav files        # Optional
             `- other files        # as needed
That is, the buildFile.xml, moduledata, and images directories are in the root of the ZIP archive. One can inspect the structure and files in a module - say module.vmod with
$ unzip -l module.vmod
from the command line.
Unpacking a module
On most platforms, a the content of a module - say module.vmod - can be unpacked to the current directory with
$ unzip module.vmod
Since a module has no base directory, it means all the files of the module will be placed in the current directory. If we want to unpack into a sub-directory we could do
$ mkdir module
$ unzip module.vmod -d module
$ ls module
buildFile.xml
moduledata
images
Example on MacOS
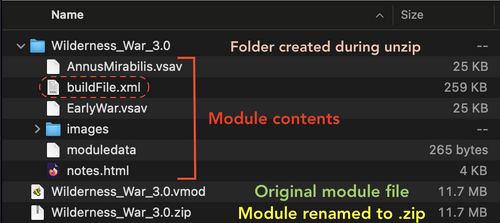
Pictured below is a folder with:
- An original, unmodified module file
- A copy of the module file with its extension modified to .zip
- A newly-created folder into which the contents of the ZIP archive have been extracted
This image comes from MacOS, which by default creates a new folder when you un-pack a ZIP archive and extracts the contents into that folder. The buildfile.xml is circled to note its required location–at the root of the ZIP archive.
Repacking the module
Imagine you’re all done with your image renaming/removal tasks and are ready to re-pack the files and test your modified module.
On most platforms, this can be achieved by
$ (cd module && zip -r ../module.vmod .)
That is, we temporarily change directory to the directory where the buildFile.xml file is, then pack the content of the current directory into a nodule one level up the directory hierarchy. For example
$ ls module
buildFile.xml
moduledata
images
$  (cd module && zip -r ../module.vmod .)
$ ls
module.vmod           module
Example on MacOS
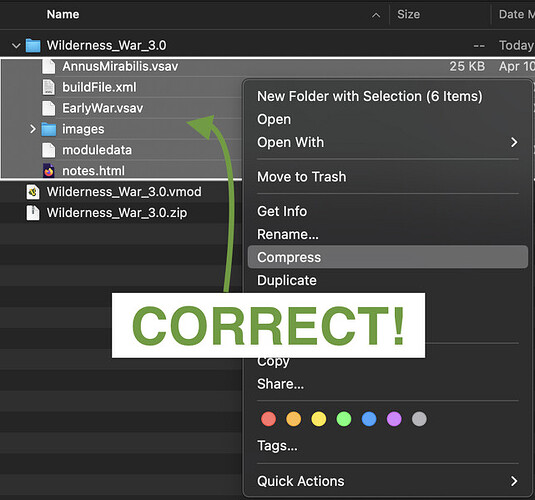
To pack up the files, do a multi-selection in Finder of the module content, as shown below, and then select Compress
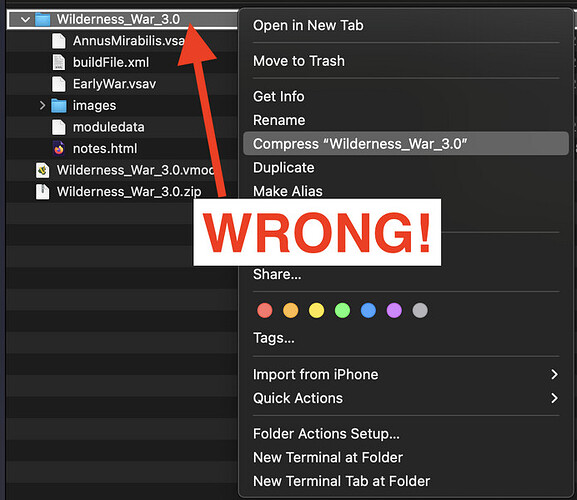
It is tempting tocompress the folder that was created with all your module’s files in it - but that is not correct. If you do what is pictured below, you will have erroneously introduced a new folder at the root level of the ZIP archive, resulting in buildfile.xml being in the wrong place. VASSAL will not detect it where it expects to, and give the error message about the file not being a valid module.
Example on Windows
Windows users have an easier method to do this task, which is to avoid relying on the built-in ZIP archive handling of the operating system and using a good quality archiving tool like 7-Zip. You can open a module directly with no need to do any file extension modification.


