Recently I have been writing custom code for a Harpoon V-like hex wargame module. Unfortunately, I struggled at times to figure out how to write custom code for a vmod. As some may be aware, the sample project listed in the official programming tutorial does not work without adjustments, and the document was initially quite mysterious to me before I delved into the source code and get my hand dirty. Therefore I have written this tutorial, which I hope will be more approachable for other developers.
Some useful materials:
- Vassal Engine Source: You will frequently to search for an API you need and look at how does the vanilla component is implemented: GitHub - vassalengine/vassal: VASSAL, the open-source boardgame engine
- VASL Repo: Like Vassal Engine but from a vmod development viewpoint: GitHub - vasl-developers/vasl: Virtual Advanced Squad Leader
- TS Vmod:
javasource is included in the vmod: Twilight Struggle - Module Library - Vassal - Not very friendly tutorial (at least to me):
- References:
- Swing Components: A Visual Guide to Swing Components (from: The Java™ Tutorials > Graphical User Interfaces > Swing Features)
Introduction
Vassal Engine is a Java written app based on the simple GUI framework Swing. Generic GUI experience is useful but does not matter much, personally I was not familiar with Swing a few weeks ago and had limited knowledge of Java as well.
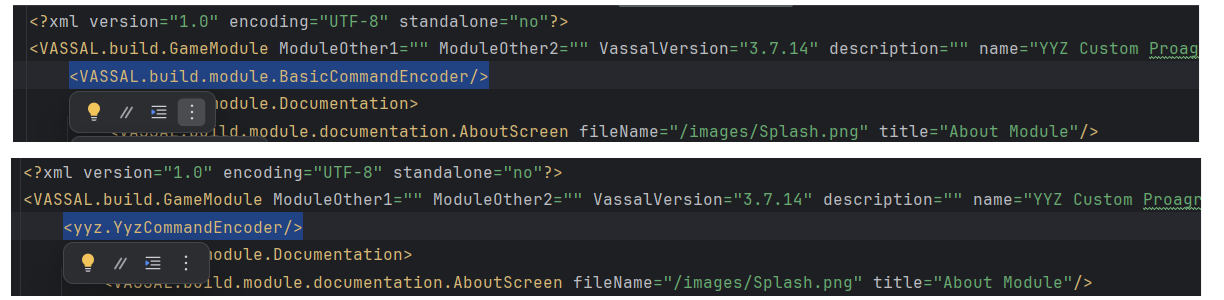
Instead of providing modding capabilities through a dedicated scripting layer (such as Lua scripting for TTS and CMO), Vassal Engine read a buildFile.xml file from the vmod (which is essentially a zip file) upon launching. This XML file contains tags that serves as a bridge for custom code, like:
<yyz.YyzCommandEncoder/>
where yyz.YyzCommandEncoder is used to load the related *.class files from vmod file and create an instance from the name using SecureClassLoader. Those instance are registered and create custom UI so player and editor can make use of them.
Create a MWE vmod
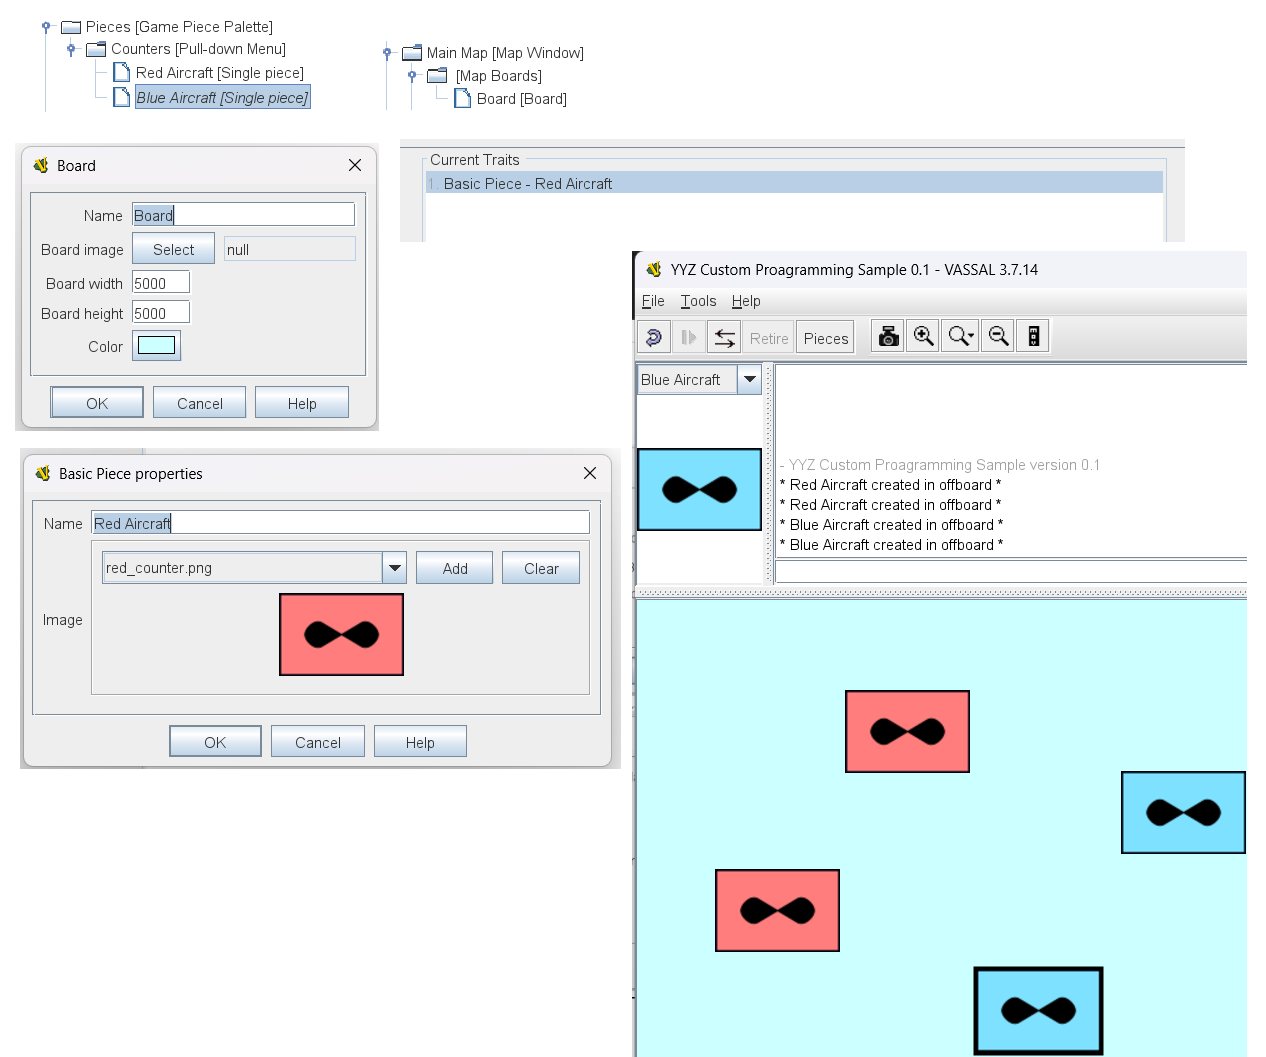
Create a minimal working example to demonstrate the use of custom code. To keep things simple, a Harpoon-like miniature wargame setting is used, which avoids the complexities with grid constraints and discrete pathfinding.
Something like this:
Development Environment
Though it’s possible to not use IDE, any non-trivial programming should use an IDE.
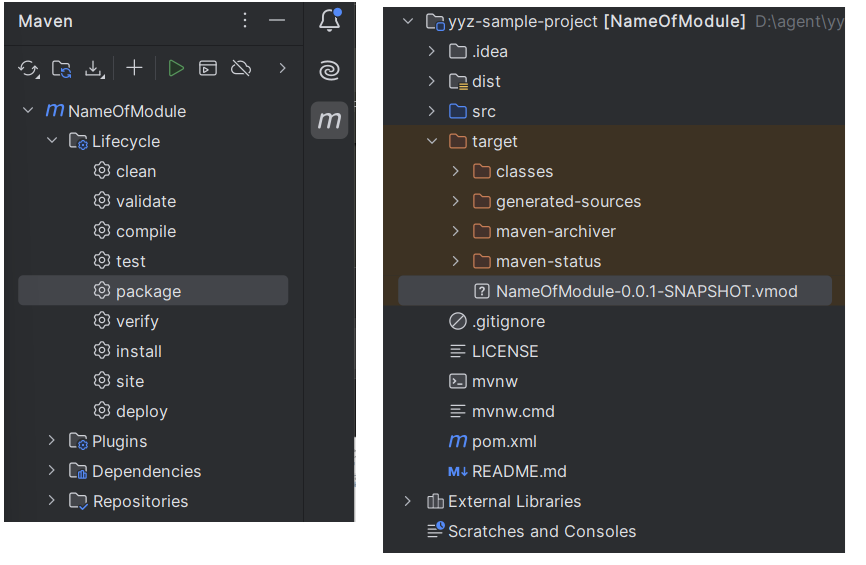
Download template:
Following the template readme, unzip the vmod and copy them to dist folder, open the pom.xml as a project in Intellij, Run the “package” command from Maven Panel to generate the vmod file.
Check if the vmod file works. Set startup configs:
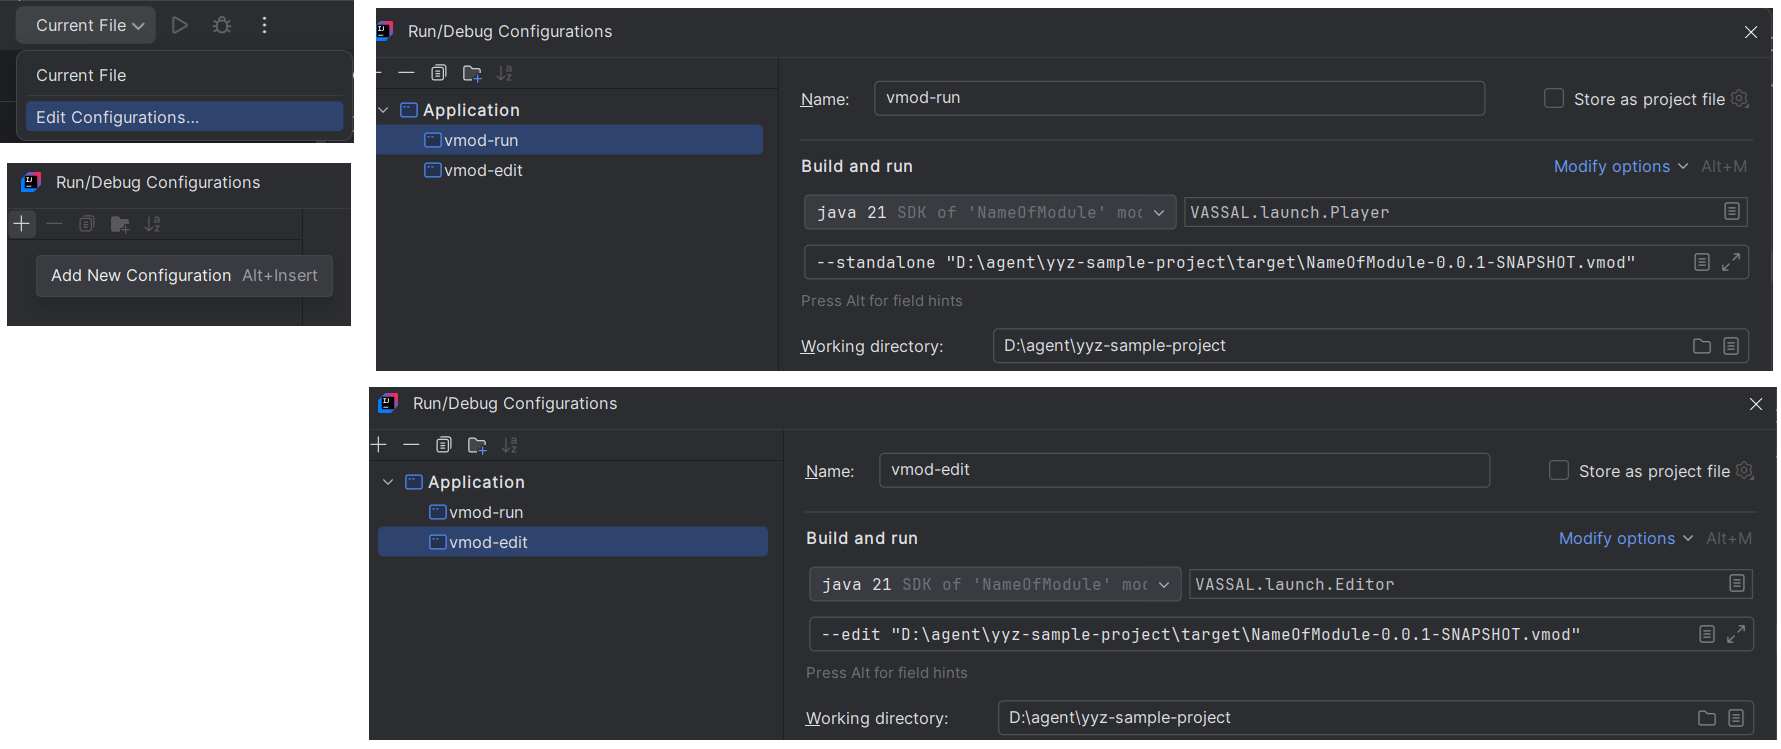
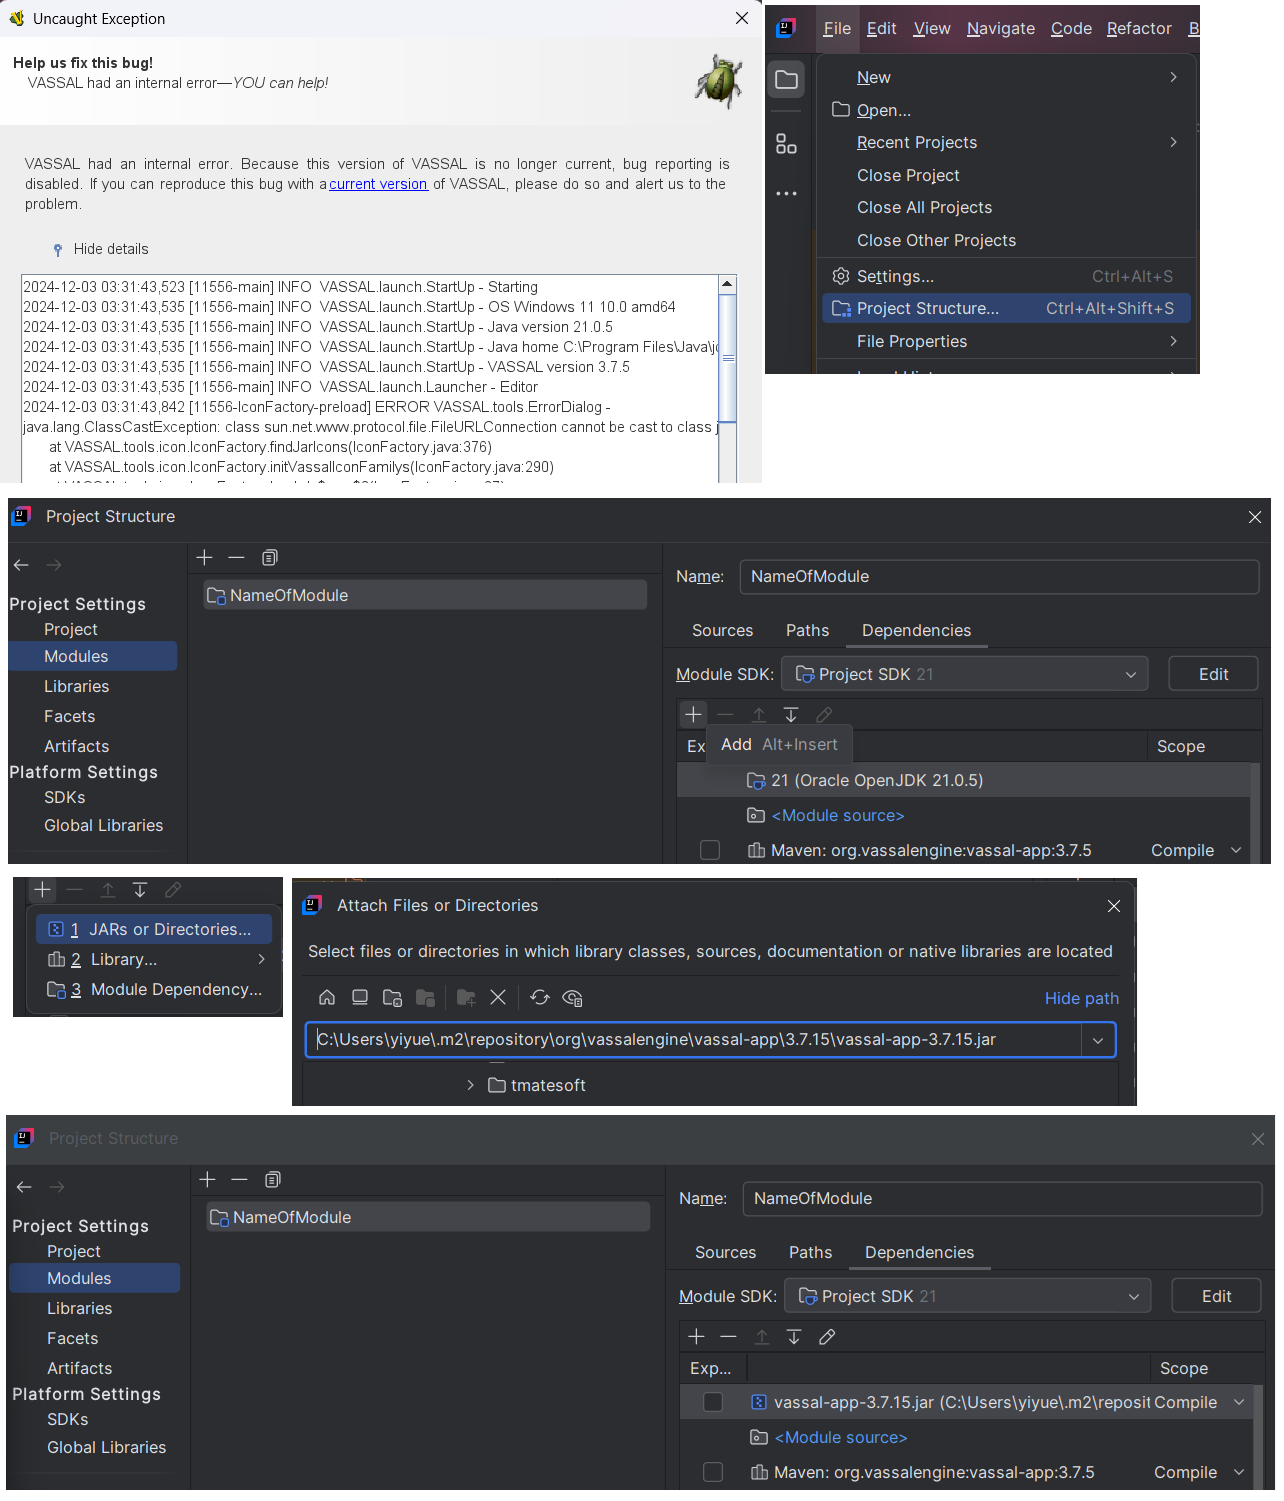
Try to start, if find an error then add a jar to dependencies.
The vmod player / editor should can be launched directly from IDE directly now.
State Representation
In Harpoon, a radar has different detection range for units with varying signatures. For example, if a unit has medium detection range of 30 and small of 15, it can detect a unit with medium signature at 30 and a unit with small signature at 15. For simplicity, we will assume units has medium signature so we just need to define the medium detection range.
Although it’s possible to define it in a dynamic property or marker, to illustrate custom UI, we will write a dedicated UI. This can be opened from the counter context menu or shortcuts to view or edit their value. (From practical standpoint, the radar info is better to be defined in a JTable while dynamic property or marker doesn’t work without hack. “Property sheet” and “Spreadsheet” doesn’t work as well as you can’t update them from code naturedly).
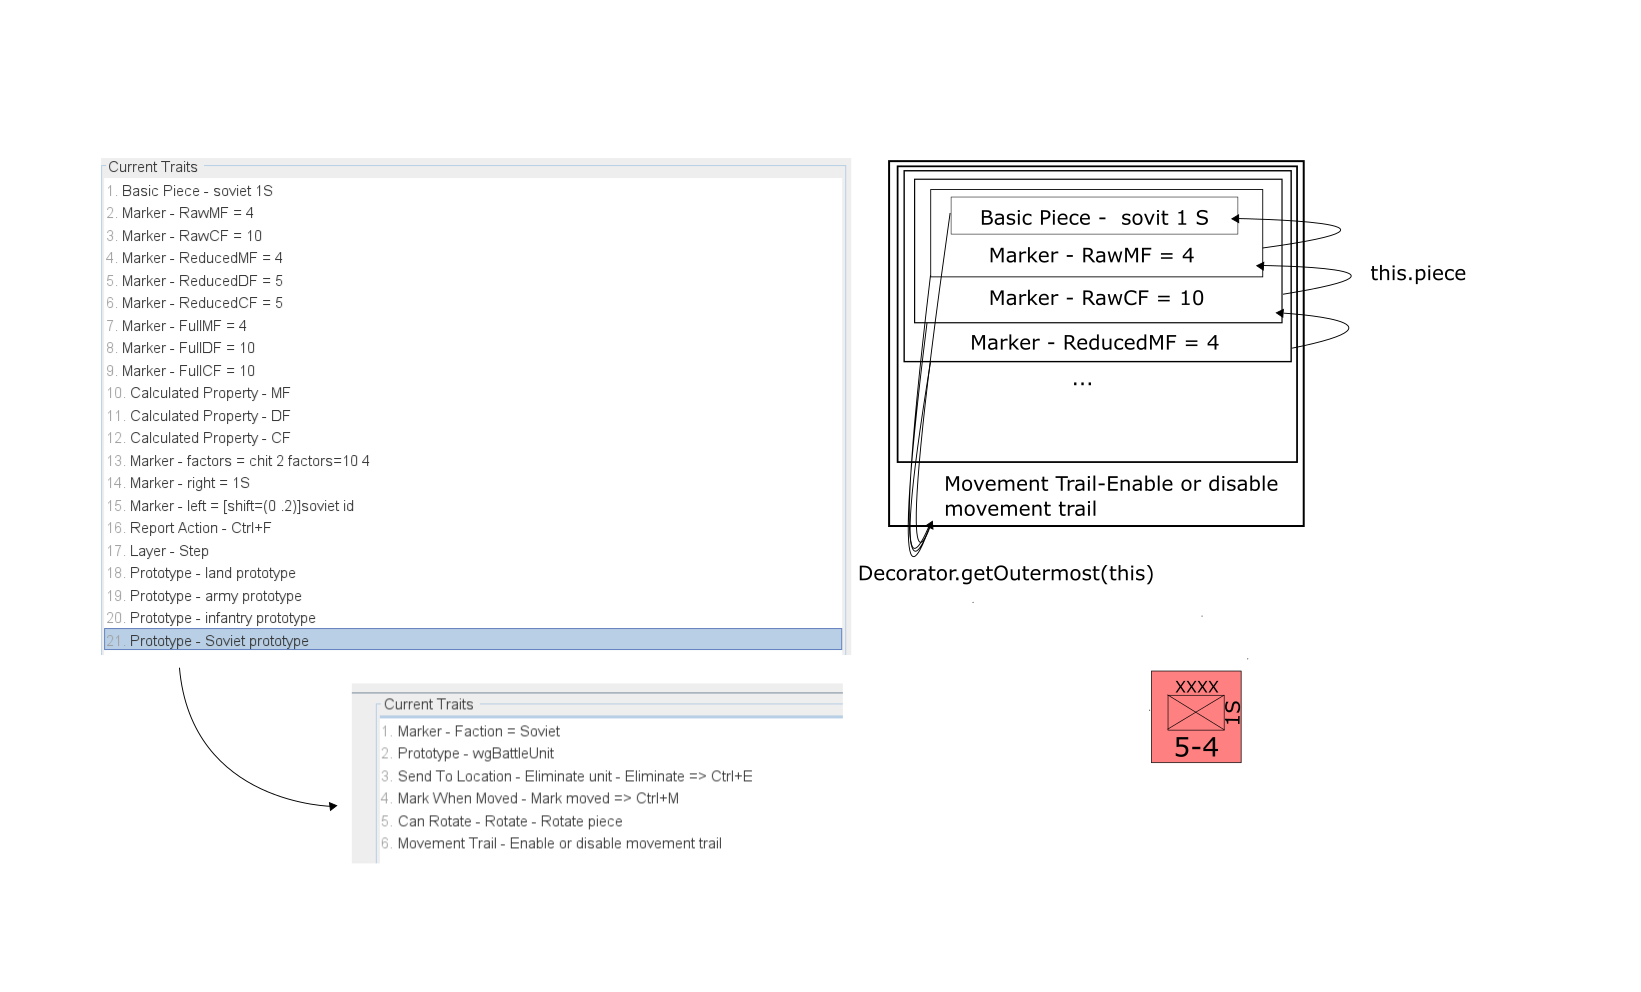
Decorator/trait stack
Every trait is a Decorator which wrap another Decorator or BasicPiece. Decorator.piece can go deep in while Decorator.getOutermost will get outermost decorator, which is expected when you iterate all piece using something like GameState.getAllPieces.
A “transparent” decorator template
To add a UI to desired attributes, add a new class extending Decorator. If you let IDE to generate default implementing code, something like this will be generated:
public class AircraftSheet extends Decorator {

    @Override
    public void mySetState(String s) {

    }

    @Override
    public String myGetState() {
        return "";
    }

    @Override
    public String myGetType() {
        return "";
    }

    @Override
    protected KeyCommand[] myGetKeyCommands() {
        return new KeyCommand[0];
    }

    @Override
    public Command myKeyEvent(KeyStroke keyStroke) {
        return null;
    }

    @Override
    public String getDescription() {
        return "";
    }

    @Override
    public void mySetType(String s) {

    }

    @Override
    public HelpFile getHelpFile() {
        return null;
    }

    @Override
    public void draw(Graphics graphics, int i, int i1, Component component, double v) {

    }

    @Override
    public Rectangle boundingBox() {
        return null;
    }

    @Override
    public Shape getShape() {
        return null;
    }

    @Override
    public String getName() {
        return "";
    }
}
It’s not an ideal starting point since it will not work like a “transparent” decorator layer, a true default decorator will delegate all works directed by the engine or outer decorator to the inner decorator, without any interference or additional processing:
public class AircraftSheet extends Decorator {
    // ID is used as the serialization identification head.
    // ";" is introduced to remove ambiguity in a "startswith" based custom Command Encoder, you can use other format if you really know what you are doing.
    public static final String ID = "AircraftSheet;";

    // Used to handle `clone = (GamePiece)piece.getClass().getConstructor().newInstance()` like inner logic.
    public AircraftSheet(){
        this(ID, null); //
    }

    // Used by the custom encoder
    public AircraftSheet(String type, GamePiece p){
        setInner(p);
        mySetType(type);
    }

    // "State" is the state in a running game
    @Override
    public void mySetState(String s) {

    }

    @Override
    public String myGetState() {
        return "";
    }

    // "Type" is the state specified in the editor and frozen in a game session.
    @Override
    public String myGetType() {
        var se = new SequenceEncoder(';');
        return ID + se.getValue();
    }

    @Override
    public void mySetType(String s) {
        var sd = new SequenceEncoder.Decoder(s, ';');
        sd.nextToken(); // Drop head;
    }

    @Override
    protected KeyCommand[] myGetKeyCommands() {
        return KeyCommand.NONE;
    }

    @Override
    public Command myKeyEvent(KeyStroke keyStroke) {
        return null;
    }

    @Override
    public String getDescription() {
        return "AircraftSheet";
    }

    @Override
    public HelpFile getHelpFile() {
        return null;
    }

    @Override
    public void draw(Graphics g, int x, int y, Component obs, double zoom){
        piece.draw(g, x, y, obs, zoom); // delegate to the inner piece
    }

    @Override
    public Rectangle boundingBox() {
        return piece.boundingBox(); // delegate to the inner piece
    }

    @Override
    public Shape getShape() {
        return piece.getShape(); // delegate to the inner piece
    }

    @Override
    public String getName() {
        return piece.getName(); // delegate to the inner piece
    }
}
Completing your first class, head to the piece’s trait editor to import and add the trait to the piece.

But if you close the window and open it again, you will find that the custom type info is lost, but a “Marker” is present there. It’s due to that Vassal’s default encoder can’t recognize type string head of AircraftSheet.ID and just do the fallback.
A custom encoder
Add a custom encoder extending the BasicCommandEncoder:
public class YyzCommandEncoder extends VASSAL.build.module.BasicCommandEncoder{
    public Decorator createDecorator(String type, GamePiece inner){
        if(type.startsWith(AircraftSheet.ID)){
            return new AircraftSheet(type, inner);
        }
        return super.createDecorator(type, inner); // delegate to the builtin encoder
    }
}
Since the encoder is called from very early so it cannot be edit in the editor normally. To enable the custom encoder, replace the VASSAL.build.module.BasicCommandEncoder tag in the buildFile.xml with yyz.YyzCommandEncoder
Then re-package and load the module and re-import, you should find the new trait works now.
Note: re-packaging will overwrite the buildFile.xml in the generated vmod file so if you want to preserve your edits, copy relevant files (esp. buildFiles.xml and moduledata) from the generated vmod back to the dist folder.
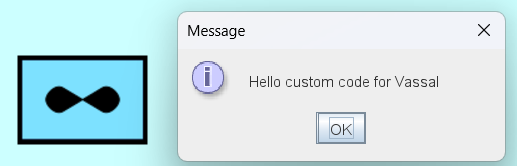
Hello, custom code for vassal
Now you can add a context command:
private KeyCommand[] commands;
private final KeyStroke openCommand = KeyStroke.getKeyStroke(KeyEvent.VK_A, 0);

@Override
protected KeyCommand[] myGetKeyCommands() {
	if(commands == null){
		commands = new KeyCommand[]{
			new KeyCommand("Open Aircraft Sheet", openCommand, this)
		};
	}
	return commands;
}

Press A or the item in the context menu will trigger it, though the behavior is not defined yet.
Strangely, in vassal, KeyStroke is used as an interface to indicate what happen:
@Override
public Command myKeyEvent(KeyStroke keyStroke) {
	myGetKeyCommands();
	if(keyStroke.equals(openCommand)){
		JOptionPane.showMessageDialog(null, "Hello custom code for Vassal");
	}

	return null;
}
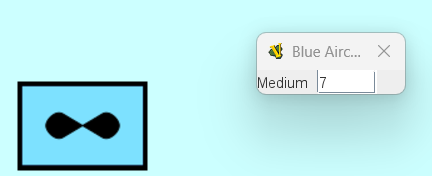
A Temporary View GUI
Firstly, show a int input as the setter for medium detection range:
JDialog frame;
IntConfigurer mediumDetectionRangeConfigurer;

public void handleOpen(){
	if(frame == null){
		var mod = GameModule.getGameModule();
		var win = mod.getPlayerWindow();

		frame = new JDialog(win, false);
		mediumDetectionRangeConfigurer = new IntConfigurer(null, "Medium", 0);

		var vBox = Box.createVerticalBox();
		vBox.add(mediumDetectionRangeConfigurer.getControls());
		frame.add(vBox);
		frame.setLocationRelativeTo(win);
		frame.pack();
	}
	frame.setTitle(getName());
	frame.setVisible(true);
}

@Override
public Command myKeyEvent(KeyStroke keyStroke) {
	myGetKeyCommands();
	if(keyStroke.equals(openCommand)){
		// JOptionPane.showMessageDialog(null, "Hello custom code for Vassal");
		handleOpen();
	}

	return null;
}
But if you save and load the game you will find the value lost.
Save & Load State
Synchronize UI and the model when window close and activated.
int mediumDetectionRange;

public void handleOpen(){
	if(frame == null){
		// ...
		frame.pack();

		frame.addWindowListener(new WindowAdapter(){
			@Override
			public void windowClosing(WindowEvent evt){
				mediumDetectionRange = mediumDetectionRangeConfigurer.getIntValue(0);
			}

			@Override
			public void windowActivated(WindowEvent evt){
				mediumDetectionRangeConfigurer.setValue(mediumDetectionRange);
			}
		});

	}
	// ...
}
Serialize and deserialize the value from vsav:
@Override
public void mySetState(String s) {
	var sd = new SequenceEncoder.Decoder(s, ';');

	mediumDetectionRange = sd.nextInt(0);
}

@Override
public String myGetState() {
	var se = new SequenceEncoder(';');

	se.append(mediumDetectionRange);
	return se.getValue();
}
Now value can be restored from vsav, but you will find that they are still lost during the replays (vlog) or in multiplayer sessions.
Replay / Multiplayer Synchronization
Other clients in a multiplayer game or the “replay recorder” will listen for “commands” published by the change maker and then execute those commands to synchronize states. For piece state change, generally a ChangePiece command, which include the old and new states of an outermost piece, should be sent:
@Override
public void windowClosing(WindowEvent evt){
	mediumDetectionRange = mediumDetectionRangeConfigurer.getIntValue(0);

	var outermost = getOutermost(AircraftSheet.this);
	var newState = outermost.getState();
	if(!oldState.equals(newState)){
		var mod = GameModule.getGameModule();
		var command = new Chatter.DisplayText(mod.getChatter(), "Change Piece");
		command.execute();
		command.append(new ChangePiece(outermost.getId(), oldState, newState));
		mod.sendAndLog(command);
	}
}

@Override
public void windowActivated(WindowEvent evt){
	var outermost = getOutermost(AircraftSheet.this);
	oldState = outermost.getState();

	mediumDetectionRangeConfigurer.setValue(mediumDetectionRange);
}
Now replay and multiplayer synchronization should be functioning correctly.
The basics of Decorator programming have been covered (AbstractConfigurable and toolbar buttons are another important aspect, if there’s interest, I may write additional post to show advanced topic not addressed in the old tutorial). Some interesting API usage are demonstrated below. You can check the reference or delve in the Vassal Engine source code or vmod with available source (esp. VASL) to learn more.
Draw a detection circle
@Override
public void draw(Graphics g, int x, int y, Component obs, double zoom){
	piece.draw(g, x, y, obs, zoom); // delegate to the inner piece

	if(mediumDetectionRange > 0){
		var g2d = (Graphics2D)g;
		g2d.setColor(Color.BLUE);

		var r = mediumDetectionRange;
		var xs = x - r / 2;
		var ys = y - r / 2;

		g2d.drawOval(xs, ys, r, r);
	}
}
And force repaint when the command is sent:
mod.sendAndLog(command);

AircraftSheet.this.getMap().repaint(); // Force-repaint when closing
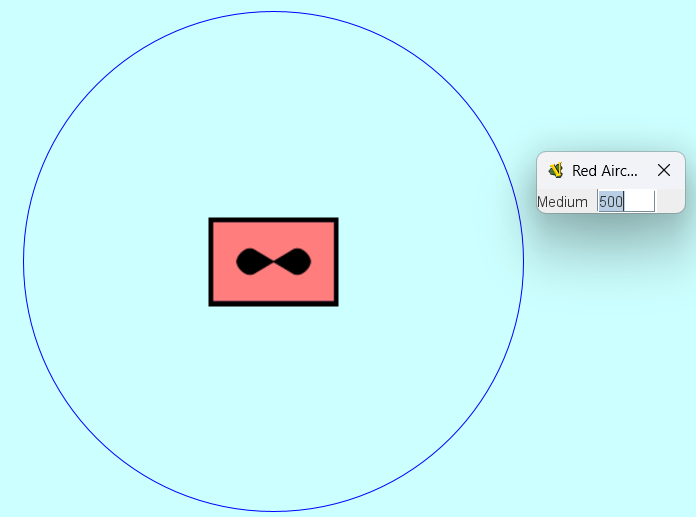
(The circle changes when window is closed, but it does not update in response to value changes in the UI. However, it wouldn’t be difficult to modify code so that it reacts to UI changes.)
Firing!
In this section, we add a menu command to fire at a target with 50% PoK. Map.pushMouseListener, Map.popMouseListener would be used to turn off default behaviour.
Add a fire command:
    private KeyCommand[] commands;
    private final KeyStroke openCommand = KeyStroke.getKeyStroke(KeyEvent.VK_A, 0);
    private final KeyStroke fireCommand = KeyStroke.getKeyStroke(KeyEvent.VK_F, 0);

    @Override
    protected KeyCommand[] myGetKeyCommands() {
        if(commands == null){
            commands = new KeyCommand[]{
                    new KeyCommand("Open Aircraft Sheet", openCommand, this),
                    new KeyCommand("Fire", fireCommand, this)
            };
        }
        return commands;
    }
Implement MouseListener and override the default mouse handler:
public class AircraftSheet extends Decorator implements MouseListener {
// ...
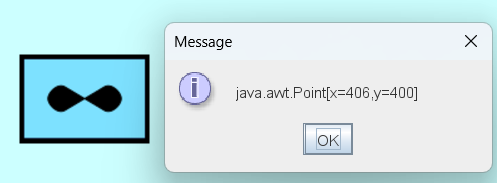
@Override
public void mouseClicked(MouseEvent e) {
getMap().popMouseListener(this); // restore default behaviour
var mapPos = e.getPoint(); // Position in the map coordinate
JOptionPane.showMessageDialog(null, mapPos);
}
@Override
public void mousePressed(MouseEvent e) {
}
@Override
public void mouseReleased(MouseEvent e) {
}
@Override
public void mouseEntered(MouseEvent e) {
}
@Override
public void mouseExited(MouseEvent e) {
}
// ...
@Override
public Command myKeyEvent(KeyStroke keyStroke) {
myGetKeyCommands();
if(keyStroke.equals(openCommand)){
// JOptionPane.showMessageDialog(null, "Hello custom code for Vassal");
handleOpen();
}else if(keyStroke.equals(fireCommand)){
getMap().pushMouseListener(this); // replace default handler with AircraftSheet
}
return null;
}
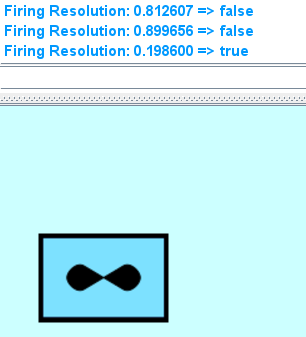
Though not always true, Map.getPiece can be used to find the piece at the given map position and execute the RemovePiece to do the kill:
@Override
public void mouseClicked(MouseEvent e) {
	getMap().popMouseListener(this); // restore default behaviour

	var mapPos = e.getPoint(); // Position in the map coordinate
	// JOptionPane.showMessageDialog(null, mapPos);
	var piece = getMap().findPiece(e.getPoint(), PieceFinder.PIECE_IN_STACK);
	if(piece != null){
		var roll = rand.nextDouble();
		var hit = roll <= 0.5;

		var mod = GameModule.getGameModule();
		var c = new Chatter.DisplayText(mod.getChatter(), String.format("Firing Resolution: %f => %b", roll, hit));

		if(hit){
			c.append(new RemovePiece(piece));
		}
		c.execute();
		mod.sendAndLog(c);
	}
}
Waypoints Plotting
In a WEGO game, unit’s waypoint plotting is essential. There changes are made:
- Track a new
ArrayList<Point>likemediumDetectionRange - In the waypoint drawing mode (F3 or context menu command), update the temp waypoint array, and update to the waypoints and synchronize when the ESC is pressed. (F3+ESC are CMO-like behavior)
- Draw two waypoints path.

Add commands and states:
private final KeyStroke waypointCommand = KeyStroke.getKeyStroke(KeyEvent.VK_F3, 0);
private final KeyStroke concludeMouseCommand = KeyStroke.getKeyStroke(KeyEvent.VK_ESCAPE, 0);

// ...

new KeyCommand("Plot Waypoint", waypointCommand, this),
new KeyCommand("Conclude Plot Waypoint", concludeMouseCommand, this)

// ...

ArrayList<Point> waypoints = new ArrayList<Point>();
ArrayList<Point> tempWaypoints = new ArrayList<Point>();
Handle mode enter:
enum MouseMode{
	FIRING,
	WAYPOINTPLOTTING
}

MouseMode mouseMode;

@Override
public Command myKeyEvent(KeyStroke keyStroke) {
	myGetKeyCommands();
	if(keyStroke.equals(openCommand)){
		// JOptionPane.showMessageDialog(null, "Hello custom code for Vassal");
		handleOpen();
	}else if(keyStroke.equals(fireCommand)){
		if(mouseMode == null){ // Permit only one "queued" firing target selection.
			mouseMode = MouseMode.FIRING;
			getMap().pushMouseListener(this); // replace default handler with AircraftSheet
		}
	}else if(keyStroke.equals(waypointCommand)){
		if(mouseMode == null){
			mouseMode = MouseMode.WAYPOINTPLOTTING;
			getMap().pushMouseListener(this);

			// waypoints.clear();
			tempWaypoints.clear();
		}
	}else if(keyStroke.equals(concludeMouseCommand)){
		getMap().popMouseListener();
		if(mouseMode == MouseMode.FIRING){ // cancel firing
			mouseMode = null;
		}else if(mouseMode == MouseMode.WAYPOINTPLOTTING){ // commit temp waypoints
			var changeTracker = new ChangeTracker(getOutermost(this));

			waypoints.clear();
			waypoints.addAll(tempWaypoints);
			tempWaypoints.clear();
			mouseMode = null;

			var changeCommand = changeTracker.getChangeCommand();
			var mod = GameModule.getGameModule();
			var c = new Chatter.DisplayText(mod.getChatter(), "Set Waypoint");
			c.execute();
			c.append(changeCommand);
			mod.sendAndLog(c);
		}
	}

	return null;
}
Move click to pressed and branch:
    void handleWaypointPlotting(MouseEvent e){
        tempWaypoints.add(e.getPoint());
        getMap().repaint();
    }
Draw dash line using the Graphics API:
void drawWaypoints(Graphics g, ArrayList<Point> waypoints, Color color){
	// TODO: Move to static or utilities
	// https://stackoverflow.com/questions/9771924/animating-dashed-line-with-java-awt-basicstroke
	float dash[] = {5.0f,5.0f};
	BasicStroke dashedStroke = new BasicStroke(
			3f,
			BasicStroke.CAP_ROUND,
			BasicStroke.JOIN_MITER,
			1.5f, //miter limit
			dash,
			0
	);
	final Graphics2D g2d = (Graphics2D) g;
	g2d.setStroke(dashedStroke);

	g2d.setColor(color);

	final double os_scale = g2d.getDeviceConfiguration().getDefaultTransform().getScaleX();
	var map = piece.getMap();

	var p0 = piece.getPosition();
	var pp = p0;
	for(var p: waypoints) {
		var ppd = map.mapToDrawing(pp, os_scale);
		var pd = map.mapToDrawing(p, os_scale);
		g.drawLine(ppd.x, ppd.y, pd.x, pd.y);
		pp = p;
	}
}
In the draw call:
if(isSelected()){
	if(!waypoints.isEmpty()){
		drawWaypoints(g, waypoints, new Color(0,0,0));
	}
	if(!tempWaypoints.isEmpty()){
		drawWaypoints(g, tempWaypoints, new Color(100, 100, 100));
	}
}
Dynamic Array encoding:
@Override
public void mySetState(String s) {
	var sd = new SequenceEncoder.Decoder(s, ';');

	mediumDetectionRange = sd.nextInt(0);
	var numWaypoints = sd.nextInt(0);
	waypoints.clear();
	for(var i=0; i<numWaypoints; i++){
		var x = sd.nextInt(0);
		var y = sd.nextInt(0);
		waypoints.add(new Point(x, y));
	}
}

@Override
public String myGetState() {
	var se = new SequenceEncoder(';');

	se.append(mediumDetectionRange);

	se.append(waypoints.size());
	for (Point waypoint : waypoints) {
		se.append(waypoint.x);
		se.append(waypoint.y);
	}

	return se.getValue();
}
Move along the waypoints
Move is as easy as to execute a MovePiece command:
private final KeyStroke moveCommand = KeyStroke.getKeyStroke(KeyEvent.VK_M, 0);

// ...

new KeyCommand("Move a step", moveCommand, this)

// ...

else if(keyStroke.equals(moveCommand)){
            doMove();
        }

// ...

void doMove(){
	var movement = 100.;
	var currentPos = getPosition();

	var changeTracker = new ChangeTracker(this); // waypoints may update

	while(movement > 0 && !waypoints.isEmpty()){

		var nextDestinatePos = waypoints.get(0);
		var dist = currentPos.distance(nextDestinatePos);
		if(movement >= dist){
			movement -= dist;
			waypoints.remove(0);
			currentPos = nextDestinatePos;
		}else{
			var p = movement / dist;
			var x = currentPos.x * (1-p) + nextDestinatePos.x * p;
			var y = currentPos.y * (1-p) + nextDestinatePos.y * p;
			currentPos = new Point((int)Math.floor(x), (int)Math.floor(y));

			movement = 0;
		}
	}

	var changePieceCommand = changeTracker.getChangeCommand();

	var mod = GameModule.getGameModule();

	var c = new Chatter.DisplayText(mod.getChatter(), "Movement");
	c.append(movePiece(this, currentPos));
	c.execute();
	c.append(changePieceCommand);

	mod.sendAndLog(c);
}
Now press “M” or the context command move selected piece along the plotted waypoint.
Implementing all pieces movement using a toolbar button and scheduling them with a computer wargame WEGO style (similar to the Flash Campaign approach) would be straightforward. However, I have omitted this implementation for the sake of brevity.
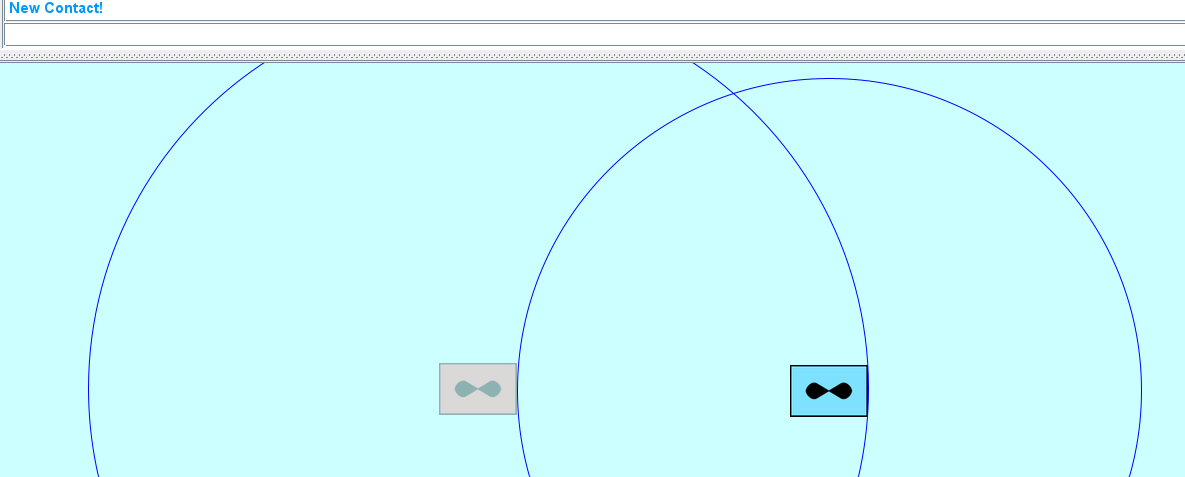
Fog-of-War Auto Resolution
We can iterate through all pieces and check if they are within the detection range, then reveal them if the range condition is met. This way, an auto fog-of-war mechanism is implemented without resorting to a referee or white side.
Firstly, add built-in Invisible to hide pieces and Marker to denote their sides:
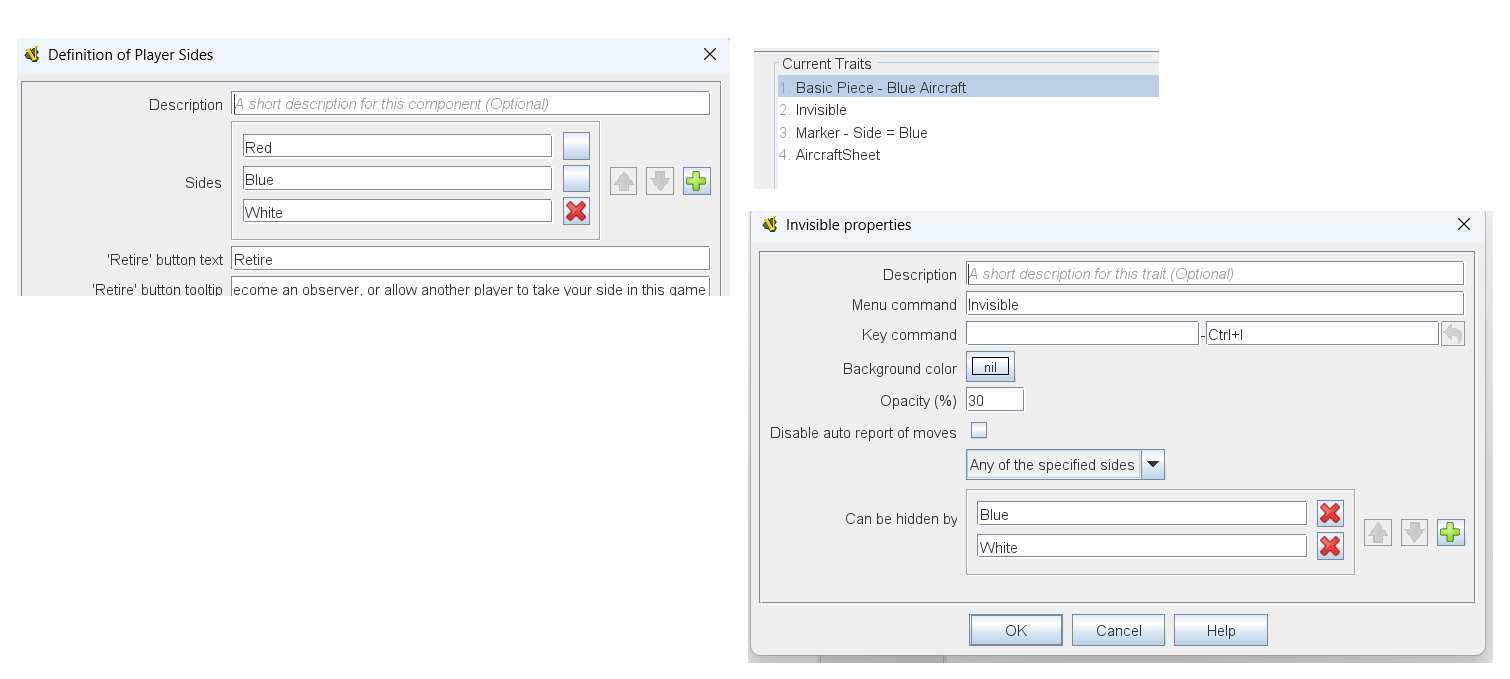
use GameState.getAllPieces or Map.getAllPieces to iterate through all pieces. Decorator.getDecorator can find custom class from outermost if it has it. getProperty, setProperty can be used to interact with Invisible Marker and other built-in traits:
void tryDetectTargets(){
	var mod = GameModule.getGameModule();

	// Fog-of-War processing
	var mySide = getProperty("Side"); // Side is assigned from a Marker
	var myPosition = getPosition();
	if(mySide != null){
		for(var p : mod.getGameState().getAllPieces()){ // getMap().getAllPieces if you want to get top stacks only
			var target = Decorator.getDecorator(p, AircraftSheet.class);
			if(target != null && target != this){
				var targetSide = p.getProperty("Side");
				if(!mySide.equals(targetSide)){
					var targetPos = p.getPosition();
					var detDist = myPosition.distance(targetPos);
					if(detDist <= mediumDetectionRange){
						var hiddenBy = p.getProperty(Hideable.HIDDEN_BY); // Hideable is the internal name of Invisible, check Vassal Source code for detail
						if(hiddenBy != null){
							var c = new Chatter.DisplayText(mod.getChatter(), "New Contact!");
							c.execute();

							var changeTracker = new ChangeTracker(p);
							p.setProperty(Hideable.HIDDEN_BY, null);
							c.append(changeTracker.getChangeCommand());
							mod.sendAndLog(c);
						}
					}
				}
			}
		}
	}
}
This methiod can be called from toolbar button to refresh detection states for every movement. But here as brevity it’s added to doMove:
Fix detection circle issue:
if(mediumDetectionRange > 0){
	var g2d = (Graphics2D)g;
	g2d.setColor(Color.BLUE);

	// Now mediumDetectionRange is treated as map coordinate instead of drawing coordinate.
	// var r = mediumDetectionRange;
	final double os_scale = g2d.getDeviceConfiguration().getDefaultTransform().getScaleX();
	var r = getMap().mapToDrawing(mediumDetectionRange, os_scale);

	var xs = x - r;
	var ys = y - r;

	g2d.drawOval(xs, ys, 2 * r, 2 * r);
}
So we get auto Fog-of-War resolution.
Source code (you can look at commit diff to see what changes between sections):