Edit
Thanks to @uckelman for recovering the forum server and for @Brent_Easton for recovering the text of this tutorial that got lost when the server crashed!! See how good it can be to reference other people in your forum posts?
Part 2
This is a follow-up mini-tutorial from my previous mini-tutorial on how to trigger a die roll from a game piece here.
In this installment, we’ll take the next step: given we can now have our leader game pieces roll a die for leader casualty check after combat, what happens if they fail the check and are killed? Normally, in the paper and cardboard game, you would pick up the eliminated leader and move him off board to the replacement track. But since this is VASSAL, we want to automate this action. Let’s see what steps are involved.
Setting up the Map Zones needed
First we have to mark the area on the Map for the Replacement Track that will hold the non-deceased leader counters. In my module, Red Badge of Courage, there are two different command structures for the CSA - one Commander is Johnston and the other is Beauregard - so I need a location for each. I’ve added a multi-zoned grid to the map for the CSA Order of Battle (which holds the replacement track). Here’s what it looks like:
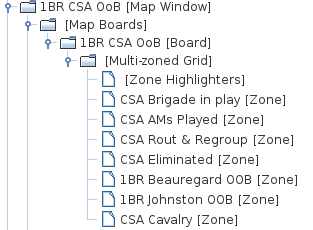
Here is what the zone looks like on the CSA OOB map:
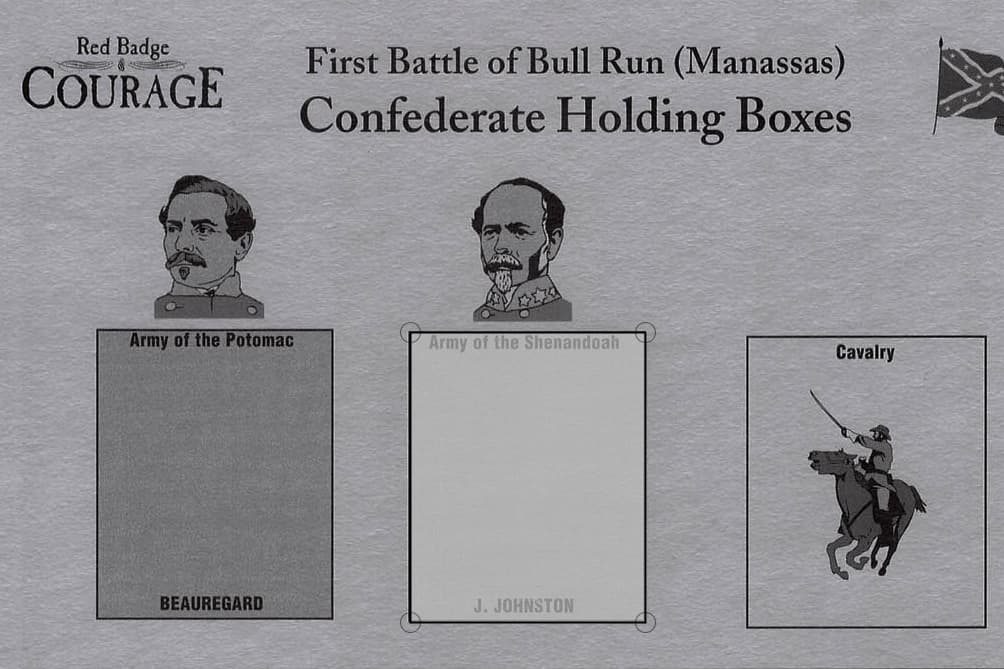
This enables me to differentiate between the Cavalry, Johnston’s units, and Beauregard’s units.
Adding piece-level properties to store the map and zone names
Now I want to create a prototype that all of Johnston’s leaders will be given called, 1BR Johnston Leader, and I will add to it two Marker properties that provide the information where leaders of his command need to be sent when they are killed in combat:
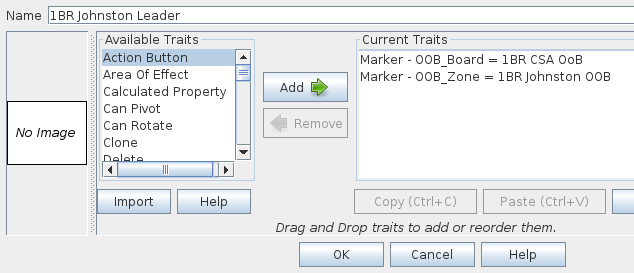
The OOB_Board gives the name of the map, “1BR CSA OoB”, (Union and CSA have separate replacement tracks), and the OOB_Zone is set to the name of the zone for Johnston on the OOB, “1BR Johnston OOB”.
Using Send to Location to move a leader to the replacement track
Next step, we will add the ability to send a dead leader to his commander’s replacement box as a generic feature to the Leader prototype. We first add a “Send to Location” trait:
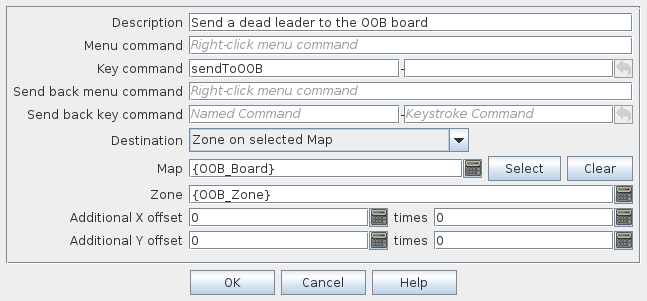
The description is just for me to help distinguish what the command does from the editor window. There is no Menu Command specified so it will not be listed in the pop-up menu for the game pieces. The command that triggers the trait is “sendToOOB” and this trait will be sending affected game pieces to a specified zone on a selected map. So I need to know which map and which zone. In the Map box, I have a BeanShell expression (you can tell because it is in curly brackets). That expression takes the value of the property “OOB_Board” and uses that value as the name of the destination map. Likewise, the Zone box has an expression that will take the value of the OOB_Zone property and use that as the name of the destination Zone. These were the property names I defined in the previous step in the prototype for Johnston’s leaders. In my example, I’m using piece-level properties but they could also be global properties and it would look the same in the Map and Zone expressions.
If you wanted to test this out - you could supply temporary values for the Menu Command and Keystroke boxes. You will now have a menu item on your counters - this will let you test that you have spelled the names of the Map, Zone, and the properties correctly (this is the most common mistake). Once you get the Send to Location working on its own, we’re ready for the next step.
Removing the dead leader
For this step, I have multiple actions that I want to combine: moving a leader, flipping the deceased leader counter to the replacement leader side and reporting in the chat that the leader has perished - so I will use a Trigger Action to combine them:

Again, the description is for me. This time, I am using the matching properties filter. It is set to another BeanShell expression that checks whether the value of the LeaderLoss_result property is equal to zero. If not the trigger will not be activated. You will recall from the previous mini-tutorial that the Die Button I created was named “LeaderLoss” - all Dice Buttons store the resulting total in a global property that is the name of the Dice Button (LeaderLoss) with the suffix “_result” added. This means the filter will block activation of the Trigger unless a zero is rolled on the LeaderLoss die roll.
Next, you will notice that not only is there no Menu Command but there is also no Key Command - so it is impossible to target this command independently. Instead, I’ve added an Also Watch… hotkey - Ctrl+Shift+Q - which sharp-eyed readers will remember is the hotkey for the menu command I specified in the previous mini-tutorial to trigger the Leader Loss die roll. So this trigger is piggy-backing off that same menu command. These were the main reasons I chose to have a specific Dice Button just for doing the Leader Casualty check - it enables me to have a very specific filter that means this sequence can only be activated when I want it to.
Note: I could also have not used the Also Watch… and instead specified a Key Command and added that Key Command into the list of actions for the Trigger Action for rolling the Leader Loss die - both work fine.
Now, once activate, what does the Trigger do? Three actions:
-
Report the Kill - this is just a Report Action with the Key Command set to “repKill”
-
Flip the Leader to the replacement leader side - we’ll look at this in a second.
-
Invoke the Send to Location trait we configured in the previous step - this is the final step and it removes the leader counter (now flipped to the replacement side) and places it in the track specific to the leader’s commanding officer.
That’s all there is to it. Hopefully, this will help you automate some of your game’s features when you think it will streamline play and make it more enjoyable for the players. It’s a tough decision how much to automate - too much and your players may feels like they have no role. Also, too much automation makes fixing exceptional game situations challenging - nobody likes to be told “You have to do it that way because that’s what the computer says.”
Next installment, we’ll take a look at how to monitor the leader status on the Leader Board - a separate map board that tracks all the logistical information about Leaders and the units they command.
If you want, you can stop here knowing how to track the rolling of dice to decide the fate of your units and to automate the entire process.
If you want, you can keep reading for some bonus material on automating the use of layers for combat unit fate.
Bonus - flipping the leader counters to the replacement side
One of the situations I came across was the use of a Layer trait to specify that “Reverse Side” of a counter - which for leader counters in Red Badge of Courage means their replacements. One of the handy aspects VASSAL allows is for counters to have more than one “Reverse Side” - which only makes sense in non-physical environments.
The way this is most often implemented in the Layer trait is like this:
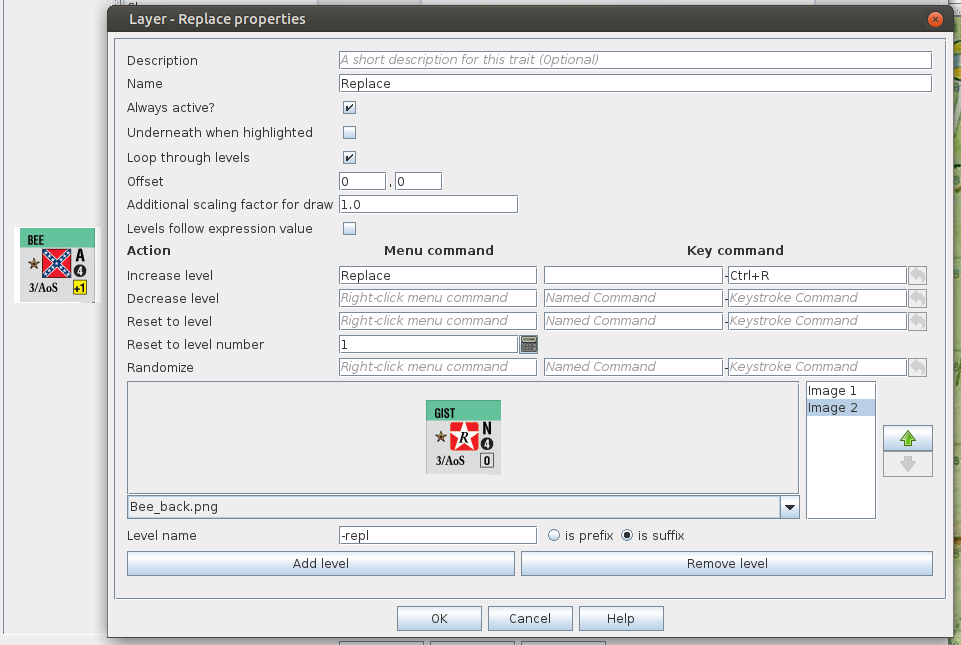
Always active is set, there is a first layer, Image 1, that is blank, and Loop Through Levels is set. So there is an Increase Level command that changes from Image 1 (the leader side) to Image 2 (the replacement side). And if needed, Replace can be used again to return to the Leader side. And so on. However, in this game - when the replacement leader is killed - he is replaced by an exact copy of the replacement leader. This is a problem. Because my automated method will just simply flip the leader - and if already flipped - we would be back to the original (already deceased) leader! I could have added some filtering to check if the leader was already flipped… but I didn’t need to (this would add some complexity - and as we’ll see in the next mini-tutorial, I need this change anyway).
Instead I reconfigured the layer as follows:
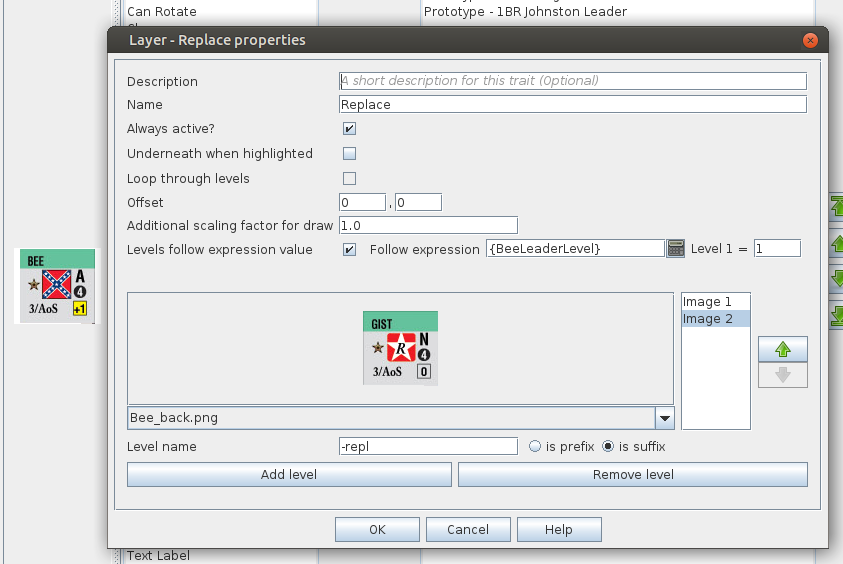
First, I removed the Loop Through Levels and instead set Levels Follow Expression… and the expression I’m tracking is a global property that is used to indicate Level 1 or Level 2. If we remember in the Trigger Action for removing the dead leader the second action had the “replaceLeader” Key Command. Let’s look at what that does. It is set to trigger a Set Global Property trait in the Leader prototype:
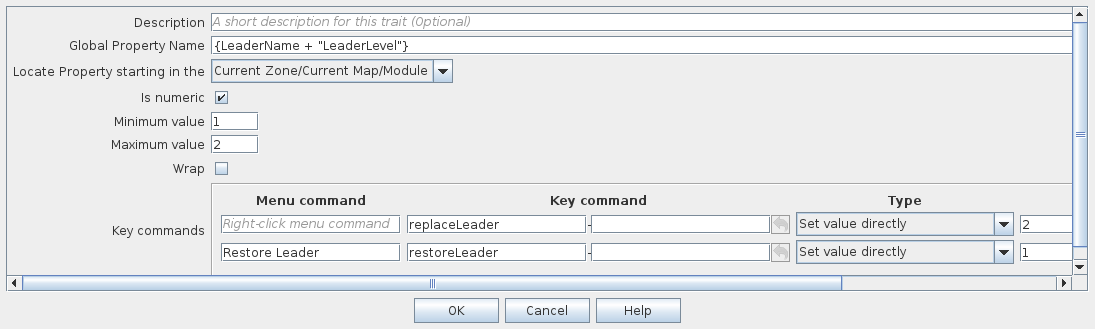
The global property name is indicated by a BeanShell expression whose value will be the name of the global property I want to modify. The property name is created by concatenating the name of the leader (stored in the “LeaderName” property - a piece-level property specific to each leader counter) and the string constant “LeaderLevel” - so in the case of Barnard Bee of Johnston’s Army of the Shenandoah, his “LeaderName” is set to ‘Bee’ - so the global property I’m tracking is: “BeeLeaderLevel” - which is exactly what I’ve indicated in the replacement layer for his game piece. This needs to be created ahead of time in the Global Properties in the module editor. Here is the module’s property list:
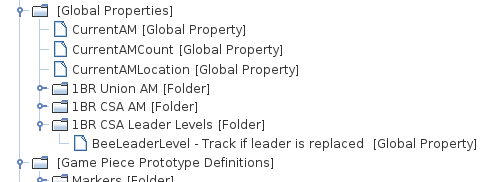
(Note: this module uses the absolutely wonderful new “Folders” feature of 3.6.0 - I recommend you check it out - it makes organizing and maintaining complex modules SO much easier - thanks @uckelman and @Brent_Easton and others).
Now, the rest of the Set Global Property trait indicates that the values are numeric, either 1 or 2. I also specify two commands that can affect the property - one that sets it directly to 1 (the original leader) using the Key Command: restoreLeader. This has a Menu Command set, so this will appear in the pop-up menu for all leader counters. And another command with no menu option, replaceLeader, that sets the value to 2 (the replacement leaders side). You’ll remember “replaceLeader” was the Key Command given in the Trigger Action trait to remove the dead leader. So that action changes the value of the global property that is being tracked by the Layer and when it changes, the Layer changes, showing the replacement leader side! Voila!